Factors Prospective Buyers Consider While Evaluating Residential Painting In The Market

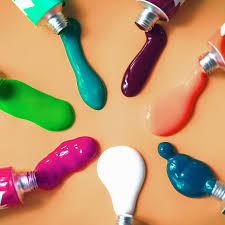
Common Problems With Acrylic Paint

Do you know how to revive old acrylic paint? Do you know when acrylic paint goes bad? If you’re new to the medium, you might be unsure how to handle some common acrylic paint problems. This acrylic paint guide will sort through some common complaints and give you some tips and tricks so that you can get back to painting.

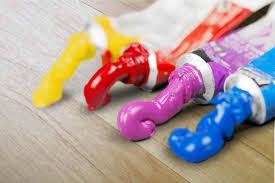
The Paint May Have Gone Bad

Sometimes acrylic paint will dry out or separate in the tube. This malfunction doesn’t necessarily mean the acrylics have gone bad to the point where it’s no longer usable. Temperature changes can change the consistency of the paint, but acrylic paint usually becomes unusable due to mold growth.

The easiest way to determine if acrylic paint has gone bad is to smell it. Expired acrylic paint will tend to have a sour, aged smell that could be the result of excess moisture where the paint was stored. The shelf life of acrylic paint is anywhere from 2 to 5 years if the tube has been opened and upwards of 10+ years if the container is sealed.

What to Do With Old Paint

Some people decide to use old acrylic paint. However, if the acrylic paint has developed a pungent smell similar to spoiled milk, your best bet is to toss the paint and start over.

The Paint Has Dried Up

Acrylic paint has dried up when the paint is stiff, thick, lumpy, and won’t come out of the tube easily.

How to Fix Lumpy Paint

Usually, you can revive the lumpy acrylic paint if you can still get the paint out the tube. Since acrylics are water-based, you can add water and mix it into the paint using a palette knife until you develop a better consistency. Be sure not to mix in too much water, which could compromise the paint coverage and color. Too much water could also cause your paint to lift off the canvas once it’s dried.

Also, water becomes ineffective if the acrylic paint is rock hard. In this case, you can try to rework the paint with a clear acrylic base. To prevent the paint from drying in the first place,

The Paint Has Separated in the Tube

If you squeeze acrylic paint, and you find a tube of thick paint surrounded by a puddle of almost-clear liquid, then the paint has separated. In this instance, the pigment and binder are no longer adequately mixed. This paint separation is not necessarily something you’ve caused; it could be due to a manufacturer error or cheap paint.

How to Revive Separated Acrylic Paint

You can revive separated acrylic paint by mixing the pigment and binder back together with a palette knife. You could also return the paint to the store for a replacement.

The Paint Dries Too Fast

Most acrylic paint is designed to dry rapidly. However, sometimes the acrylic paint dries on the palette before you’ve had a chance to get it on the canvas.

How to Prolong Acrylic Paint Dry Time

Try to eliminate any drafts where you’re painting by closing a window or turning off a fan. If you are painting outside on a windy day or hot, consider going inside. Also, keep a spray bottle on hand and gently mist down the canvas and palette every so often to keep things moist longer. Some people also add paint retarder to their paint. However, make sure you don’t use too much or your paint might never dry.

Tips for Keeping Water-based Paint Thin

Avoid Leaving the Paint Can Open

One of the easiest ways to avoid the thickening of your water-based paint is to simply close the lid on the can when you finish pouring paint into a bucket or roller pan. Leaving the lid off of the paint can too long does allow moisture to evaporate from the paint, which will, in turn, make it thicker. So, as soon as you pour your paint, close the paint can.

Tip: Also, a slight covering of water on the surface of the paint is great for keeping the paint from thickening too much as you let it sit. Pour a small amount of water very slowly on top of the paint in the can. If you pour it in too fast, it will just mix with the paint.

Keep Stirring

If you’ve been unable to prevent your paint from getting thick, it will take some work to make it usable again. Fortunately, it’s not hard work.

When allowed to sit for a long time, latex paint will decant, with the heavier particles settling to the bottom. Before trying to thin the paint, stir, stir, and then stir some more. The more you stir your water-based paint, the smoother it will become. If you have a drill, consider purchasing a paint mixer extension to make the process easier and more efficient. The electric drill stirring rod is very sharp. Insert or remove the stirring attachment with the electric drill unplugged.

When stirring your paint, keep in mind that stirring the paint for only a minute or so usually won’t mix the paint well. If you’re stirring the paint by hand, stir the paint continuously for at least five or 10 minutes.

Tip: Also, when using more than one gallon of custom color, you should pour the paint back and forth repeatedly to mix the paints. This is called ‘boxing’ the paint and it will make your color more consistent between cans since custom colors are known to vary slightly with each mix.

Use Water to Thin Water-Based Paint

If stirring isn’t enough and you do need to add liquid to your water-based paint to thin it out, try using water before adding anything else.

Add an ounce or two of water to the can and then thoroughly stir. Continue to add water in small increments until the desired consistency is achieved. If you add too much water at the start, you will find that a lot of time will be needed to thoroughly mix the paint, so remember, add a little, then stir a little. Continue the process until the paint consistency is just right.

Can you wait too long between coats of paint?

Yes you can wait to long, if you leave it for too long the paint can get weathered when painting outside and the paint can breakdown. it is advised to wait no more then a month between coats at a max. Because if you leave it any longer it may deteriorate. Exterior surfaces are the most vulnerable in this case. But another downside to doing so, is that you may need to clean the surfaces and it implies more work in preparation before apply another coat. So It is a good idea to wait for the required time for your type of paint, being 1 to 2 hours or up to 24 to 48 hours depending on the paint and then applying your finish coat to get the job done.

Safety

Since oil-based paints can emit toxic fumes, you should always wear a face mask when you’re working with them as well as safety goggles to protect your eyes when spraying the paint.

The environment you’re working in should also factor in your safety considerations. If you are working in a tight, enclosed space, the face mask alone may not cut it, so you may need a respirator or ventilator to avoid fumes and maintain good airflow.

How to Correct Painting Mistakes

Your best friend when it comes to painting out your mistakes is a tube of titanium white. This extremely opaque, warm white will cover any color, even blacks, and other deep pigments when applied in a few thin coats.

Many artists make the mistake of adding a single coat of titanium white, then continuing on with their painting. This may cause any new pigments you apply to be tinted by the paint under your cover-up, and the colors will not be as true as you wish them to be.

You should apply at least two thin coats of titanium white, and the second coat should be applied only after the first is dry. This will give you a clean, white base to begin painting on after it has dried.

Points To Be Contemplated When Employing Exterior Painting Contractors

How to Choose Exterior Paint Colors Using a Visualizer

Exterior paint colors can make all the difference when it comes to your home’s curb appeal, especially if you’re trying to sell. The color of the exterior of your house is the most public design decision you will ever make. Given the fact that it will add value and beauty to your home, outdoor paint color plays an essential role in how potential buyers will perceive your house. But with thousands of exterior paint colors available, it can be a daunting task to choose the right one. Which is the best one for your home? And how many layers of paint do you need to get the required durability? Technology to the rescue!

The Basics of Choosing Colors

Before you begin choosing the right house color, start out with helpful resources. With a home color visualizing tool, it’s important to get the basics right. For instance, consider the size of your home when planning on painting its exterior. The size can influence whether dark or light colors are more appropriate. As a general rule of thumb, light colors will make your house appear larger and will be more affected by different light conditions, whereas dark shades can make your property appear smaller and help it blend with the surroundings.

Look to a Color Visualizer Before Buying Paint

Once you get the basic idea of what you want for the exterior of your home, you can use a color visualizer to find that perfect color. You can browse by popular colors, color families, or decorator picks. Many major paint companies offer this tool with exterior options including McCormick Paints, Sherwin-Williams, and Benjamin Moore. While the specific interface for each paint tool is a little different, all use similar methods to allow browsers to test various paint options. Simply by uploading exterior photos of your home, you can see what different paint colors might look like on your walls. It is a great way to virtually experiment and gets ideas and inspiration for your home’s color scheme.

Confirm Your Color Choices With Paint Samples

Now that you have narrowed your choices using a virtual tool, it’s time to confirm them with color samples in your staged home. While visualizers are helpful, there is no substitute for seeing the color on the walls of your home in real life. Buy test sizes of the paint colors you are considering and put some brush-outs on the outside. Make sure to put some color on both the south and north sides of your home as lighting there can differ dramatically. Also, visit these areas at different times of the day to get a fair idea of how the finished product will look.

Don’t Limit Your Color Choices

Ideally, an exterior scheme should have three major parts: A field color that dominates; an accent color that brings shutters, doors, and other smaller parts to life; and the trim color. Once you have chosen an appealing combination of field and trim, make it stand out with an eye-catching accent color. Feel free to go bold, but don’t go overboard.

Tips for Choosing Exterior Paint Colors for Your House

Picking house paint colors isn’t just difficult; it can be terrifying! If you choose colors that are boring and blah, your house will seem flat and featureless, but if the paint colors are too bold, they can overwhelm the architecture or might even infuriate the neighbors. The potential rewards are substantial, though. Getting it just right by choosing the perfect exterior house color and trim combinations can change your life.

As you consider paint colors for you home’s exterior, keep in mind that the best paint colors are those that highlight the most beautiful features of your home. That’s one reason to know a little bit about residential architecture since history can tell you a lot about what colors have worked for various house styles over the years. Also remember that skillful use of color can sometimes disguise design flaws, boosting the curb appeal and market value of your home

Tips for Choosing Exterior Paint Colors

How do you find that magic color combination? Professional designers suggest 12 specific techniques. And please note that no expert ever suggests buying a paint color because it’s on sale or because your painting contractor can get you a deal!

Honor History

If you’re planning to paint an older home, you’ll probably want to use a historically accurate color scheme. One way to do this is by a simple form of archeology—you can hire a pro to dig down to old paint layers on your siding and trim to analyze them and recreate the original color of your house. Or, you can refer to a historic color chart and select shades that were common at the time your home was built.

Consider Jazzing Up the Past

In some neighborhoods, it’s common for homeowners to fly in the face of history. Instead of choosing historically accurate colors, they paint with modern colors to dramatize architectural details. Using bright colors on old architectural details can produce startling and exciting results—if your local historic commission approves. But before you buy 10 gallons of bubblegum pink, it’s a good idea to look at what your neighbors are doing. A fluorescent colored Victorian that looks splendid in San Francisco can seem wildly out of place in more conservative neighborhoods of the Northeast. The bright pink stucco that is common in Florida might truly startle neighbors in Washington State—which can be either good or bad. Remember that what’s deemed as an acceptable color scheme may be dictated by region and neighborhood, not just historic architectural style.

How to Select Exterior Paint Colors for a Home

If you’re painting the outside of your home, don’t be afraid to take a little time with the color decision. “Your interior is about your personal color tastes,” says Tom Lee, Senior VP of Consumer Marketing for Behr, “but the exterior is really about durability. It’s about protecting the biggest investment you have.” It isn’t an easy decision to redo, so don’t rush it.

Plan to spend a little more money. Investing in a premium paint such as Behr Marquee Exterior Paint & Primer in One is a wise choice. You don’t want to be climbing up a scaffold again anytime soon — or paying for someone else to do it — so paint needs to cover well, resist stains and stand up to weather.

Think about your permanent materials. If you have an existing brick or stone foundation, patio, or accents, work with their underlying tones as you’re choosing a paint shade. If you’re stuck, try pairing opposites in terms of color temperature. For example, if you have a warm red brick foundation and you want brown for your exterior paint, choose a taupe with cool gray/blue undertones instead of a peachy tan.

Take advantage of technology. You can usually bring in a sample of permanent materials to the paint store for computer color matching. Behr also offers an online tool called that lets you choose an initial color, recommends matching/coordinating colors, and helps you experiment with color combos on images of a home exterior so you can imagine the finished look.

Don’t forget the trim. If you want something other than the usual white, try your exterior color just a few shades lighter for a subtle, elegant effect.

How to Choose the Right Exterior Paint Colors

Are you struggling with choosing the right exterior paint color for your home? I’m here to help and walk you through each step for choosing the right paint color combination for the exterior of your home.  I’m going to make this real easy for you guys, I promise!

The number one paint question I have received over the years is about choosing exterior paint colors because it’s one of the most difficult paint decisions you can make for your home.    You want your home to have beautiful curb appeal and you don’t want to make any color mistakes. If you follow my seven steps below, I promise you will avoid the common mistakes and will be able to make exterior paint color decisions that will be beautiful! Stick with me on this!

CHOOSE YOUR SHADE FIRST

The first thing you will want to do when deciding what color you want to paint the exterior of your home is to choose the shade of a color first. When I say “shade”, I mean do you want a light, mid-tone or dark color on the body of your home? At this point, you don’t have to consider anything else except to make a decision if you want a light or white color, a mid-tone or medium shade, or do you want a dark color.

For most of you, choosing a shade is an instant easy decision and you immediately know that you want a light or dark colored home.  However, some of you may not be sure and are open to any shade and need a little help making that decision. It will help if you search Pinterest for exterior homes for inspiration to determine what shade would look best for your home. For example, if you have a ranch style home, search “ranch style home exteriors” in Pinterest search to see all the different color options to inspire you

CONSIDER YOUR ROOF COLOR (AND OTHER ACCENT COLORS)

Before you can go much further in your color decision-making, you will need to consider the color of your roof.  If you have a black or neutral gray, you don’t have to worry as much about color clashing. Unfortunately, I have a dark brown roof with slight red undertones, so colors like shades of green or blues wouldn’t work for me and would clash.  For those of you that have a roof with red, tan, green or blue gray undertones in your shingles, you will for sure need to factor in your roof color as you choose your exterior paint color palette.

Tips for Choosing the Best Exterior Paint

Summer is here and that means we can finally tackle those big outdoor summer projects! If you’re planning on painting the exterior of your home this summer, I wanted to share some important tips that will help you when choosing the best exterior paint for your home that will last years

It’s not easy deciding on a high quality exterior paint for the home because there are hundreds of different exterior paint products on the market. I know it’s seriously overwhelming and I’m gonna make it real easy for you today and help you sift through so you can zone in on the very best exterior paint for your project

NOT ALL EXTERIOR PAINTS ARE EQUAL

I have learned so much over the years about exterior paint products from my own projects, client projects and also working with paint companies. Unfortunately, I have also learned the hard way that not all exterior paints are created equal. Nothing is more frustrating than spending a fortune to have your house painted and you have to repaint within 2-3 years!

DURABILITY

The most important factor when choosing an exterior paint is durability.  You may be surprise to know that a highly durable exterior paint finish should last at least 5-10 years. Yes! You read that right! The best exterior paint that is applied properly can last up to 10 years! It is possible!

PAINT AND PRIMER (ALL-IN-ONE)

In my opinion, nothing is more important than using an exterior paint product that has primer in it. This is absolutely non-negotiable for me and the most important requirement that I have when it comes to choosing an exterior paint. The reason it’s so important to me is that unlike traditional paints, primer paint contains binding properties (fancy word for glues), which means the primer will act as a sealant.  Primer creates a binding layer (or) sealed layer on the material being painted that will increase durability making it more water and mold-resistance. Not too mention that you will have better coverage because primer will mask underlying color and imperfections better! That’s exactly what we need to have from an exterior paint.

Advice For Painting Your Ceiling

Suspended Ceilings – What Types Are There?

The best part of suspended ceilings is that they can be installed using DIY methods; thus, you can save cost on professional services. However, a little know-how of ceiling installation and use of tools and equipment is required if you want to opt for DIY methods.

If you are contemplating the idea of getting a suspended ceiling installed in your room, you must be aware of its different types available in the market. In this article, we have covered all the common types of suspended ceilings. Continue reading further to know about them.

Concealed Grid Suspended Ceilings

If you want a smooth and clean look with your suspended ceiling, opt for concealed grip. This type of suspended ceiling hides the grid system using acoustical tiles. The advantage of installing concealed grip suspended ceiling comes in form of its appealing and aesthetic look. On the flip side, it doesn’t allow easy access to areas above the ceiling for repair purposes. Moreover, it can prove to be expensive as compared to other types.  

Gypsum Board and Plaster Suspended Ceilings

This type of suspended ceiling is commonly used in different parts of public buildings such as theatres, lobbies, and auditoriums etc. A gypsum board and plaster suspended ceiling can either be screwed to simple light gauge steels or some special framing components can be used for this ceiling. While simple light gauge steels are suspended on wires, special framing components are specifically developed for this type of ceiling that are available in different complex shapes.

The major benefit of installing a gypsum board and plaster suspended ceiling is the value it adds to your room. It has a distinct design, which will give your room a contemporary look.

Exposed Grid

It is a common and inexpensive type of suspended ceiling. The factor that set exposed grid suspended ceiling apart from other types is its composition. It has long metal strips known as mains. These mains are connected to each other using tees. Tees are the short metal pieces.

Tees and mains combine to make a grid system. Acoustical ceiling tiles are used to fill the said grid system. Around each tile of the exposed grid, there is a standard metal frame. This frame is available in different measurements.

Fire Resistance Rated Suspended Ceilings

This type of suspended ceiling is preferred due to its resilience against fire. It is made of a specifically designed material that resists fire. Installation of fire resistance rated suspended ceilings is a process that must be performed by experts as it requires ample knowledge and skills. Moreover, lighting fixtures used in this type of ceiling must also be backed up using a material that is resistant to fire. Simply put, each part of this type of suspended ceiling including the panels that give access to repair and maintenance of ducts and pipes must meet fire resistive requirements.  

Suspended Drywall Ceilings

A suspended drywall ceiling uses hangers and wires instead of metal grids. If you do not want to spend a huge amount of money on suspended ceilings with frame, you can opt for this type of suspended ceiling. It gives an aesthetic look because of its different design.

Ceiling Tile Materials and Design

Ceiling tiles come in an infinite variety of textures and designs. Most ceiling tiles are made from mineral fiber, but other materials are available, such as fiberglass. Mineral fiber tiles typically have a high Noise Reduction Coefficient (NRC), which means they are good at absorbing sound within a space to prevent echo or loud environments. While some tiles have a high Ceiling Attenuation Class (CAC), meaning they prevent sound from passing through the ceiling to another space, acoustic ceiling tiles are generally not used to provide privacy between spaces.

In addition to tile material, there are a wide variety of designs available. Tiles may have a rough appearance or a smooth appearance. Tiles may also have designs imprinted in them or other patterns scored into the tile.

Ceiling Features

If you’re having noise issues, you can conveniently add a sound absorbing ceiling to your space that dampens the sound within a room and helps block sound between rooms with a suspended/drop ceiling. In addition to acoustics, eliminate the worries of staining and sagging with these ceiling options and gain moisture performing benefits that are ideal for a basement.

It’s important to remember that different types of ceilings offer a variety of functionality. It’s never been more important to make choices that simplify our lives, especially when it comes to the task of cleaning. Selecting easy-to-clean, time-saving materials for your new ceiling is possible with our wide selection of wood, coffered or metal products that are ideal for kitchens or half baths where cleanup is easier than ever.

A Few Good Reasons to Choose a Drop Ceiling vs. a Drywall Ceiling

Easy

Home improvement enthusiasts agree hands down that a drop ceiling project can be easily and quickly tackled by most home owners. It is not difficult to install, does not create a mess and is fairly quick to complete.

Decorative

When it comes to decoration and design, your options are endless with a drop ceiling. Simply browse our website and you will understand why.

Practical

One of the biggest benefit to a drop ceiling is that you have easy access to plumbing, wiring, and duct work. If any maintenance issues arise, you can simply remove a ceiling tile. If a tile gets damaged, simply remove it and replace it.

How are suspended ceilings installed?

To install a suspended ceiling, the first stage is to measure the dimensions of the room to be able to accurately design the suspended ceiling grid.

Once the dimensions have been accurately taken, the drop of the ceiling needs to be determined to measure around the perimeter of the room. By effectively measuring and marking the drop of the ceiling, this prevents any nasty surprises when the grid is fitted.

The false ceiling is hung from a bracket fixed to the underside of the floor slab, supporting a series of interlocking metal sections that form the grid. Beam systems are also available, in which tiles are laid between parallel beams rather than a grid, and there are a wide range of different grid profiles and tile edge details that can be used to allow the grid to be exposed, flush, recessed or concealed.

When the grid has been fitted, installations can be made for lighting, speakers, air conditioning and anything else that needs to be concealed within the ceiling.

The final stage is to place the chosen tiles within the frame to complete the finished suspended ceiling. There are a variety of tiles that can be used, dependent upon the chosen aesthetic.